Proxy through SSH
Accessing an HTTP proxy using SSH tunneling
Accessing resources on an intranet can sometimes be problematic. Using SSH tunneling to access an HTTP proxy server is a simple and quick solution. The connection over the Internet will be secured by the SSH encryption, and the proxy will be able to access servers on your behalf and deliver the content to your browser, or other software that can use an HTTP proxy.
In this example we are using the following software:
- PuTTY: A Free Win32 Telnet/SSH Client
- Internet Explorer: Microsoft’s Web Browser
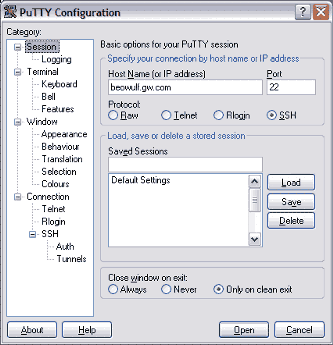
PuTTY Configuration
Enter the name of the host that you connect to normally (e.g. beowulf.gw.com) and select the SSH protocol. Go through the settings and choose your preferences. You probably want to pay attention at least to the following:
- Window: number of rows, scrollback size
- Appearance: cursor type, font
- Colours: text and background colors
I find the defaults in PuTTY well chosen, so if you are in a hurry you can probably ignore most of the categories right now. If a particular behaviour is getting to you later, you can always return to the configuration options and chances are that you can adjust everything to your liking.
If you make many changes and plan to add multiple sessions (hosts) then you should first save all your choices in the Default Settings without a host name. After the defaults are set you can continue with adding sessions to specific hosts.
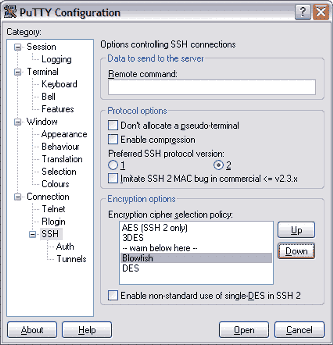
SSH Settings
There is one very important setting to adjust: you should choose SSH protocol version 2. The default is still version 1, which unfortunately is insecure. Even more unfortunate is that there is no fix to make version 1 secure, so you should just never use it.
You should also disable the Blowfish encryption cipher. It is buggy on some SSH server versions, and can cause strange misbehaviour if it ever gets selected in the negotiation between PuTTY and your server.
Select the SSH category, then find Blowfish in the list of ciphers. By default it is the second best choice PuTTY will pick. Click on it, and then click Down until it is below the warning indicator.
You should make sure you save these two changes in the Default Settings so they will be used for all new sessions. All settings up to this point can be used in all sessions without the sessions interfering with each other.
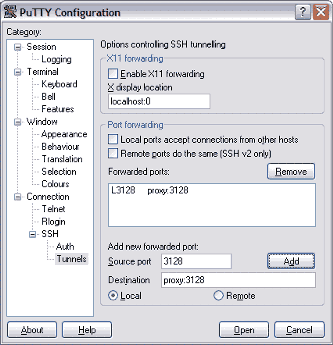
Proxy Tunnel
The connection to the proxy is realized using SSH port forwarding. PuTTY will listen to the local port that is forwarded. When it accepts an incoming connection, it will ask the remote SSH server to open an outgoing connection to the proxy. It will then forward all traffic from these connections inside the encrypted SSH connection between PuTTY and the SSH server.
Only one program can listen to each local port simultaneously. What this means is:
- You can only forward the same port number to one proxy, and from a single instance of PuTTY at the same time.
- You can only forward port numbers that are not used by other programs on your computer (e.g. by Windows).
To avoid ports important to the operating system, select a port number above 1023. Common choices are ports used by proxy servers:
- 3128: the default port for Squid proxy servers
- 8080: the default port for Microsoft ISA proxy servers
Enter the selected port (e.g. 3128) in the Source port field. This is the port number you will use later in the browser configuration. (Make a note!)
The proxy server name and its port number are entered in the Destination field, separated by a colon (e.g. proxy:3128). Make sure to leave the Local button selected, to indicate that the source port is on your machine.
Once you click on Add the setting will be displayed in the Forwarded ports listbox. Don’t forget to go back to the Session settings to Save your changes, including the forwarded port.
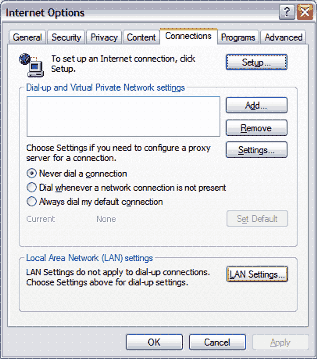
Internet Options
Whenever you are connected using a session with the port forwarding enabled, you can configure your web browser to use the forwarded port as its proxy.
A forwarded connection will work just like a normal proxy server connection. If your proxy asks for a password, it will ask for it using the forwarded connection as well. The proxy server will see all proxy requests as originating from the SSH server, as opposed to the client machine. Therefore the SSH server must be allowed to use the proxy for you to be able to use a forwarded connection through it.
The proxy configuration is done in the Internet Options applet. It can be started from the Control Panel, or from the Tools menu of an already running browser. Select the Connections tab and click on LAN Settings.
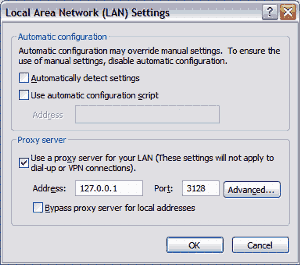
LAN Settings
Clear all check boxes in the Automatic configuration section to make sure the manual settings are used.
Fill in the Proxy server section. The address is 127.0.0.1 (usually also known as localhost — the numeric form is always guaranteed to work). The port is the local port number selected earlier as the forwarded port (e.g. 3128 — check that note you made).
Click OK twice (once on each open dialogue) and you are ready to browse using the forwarded proxy connection!
If there are servers that the proxy cannot access, the LAN Settings dialogue provides two quick fixes that may help:
- Bypass proxy server for local addresses: This means the proxy won’t be used for addresses where the server name does not have a dot (e.g. http://www/).
- Exceptions: You can list exceptions in the Advanced settings to avoid using the proxy for selected domains or IP addresses (e.g. *.mydomain.com; 10.*.*.*; 192.168.*.*).
Copyright © 2002–2024 Kimmo Suominen. All rights reserved.